Thursday, March 22, 2012

How to enable http interface in VLC Player 2.0.0 (Twoflower)

Note: Added ScanIP functionality to the VLC remote.
If you know how to install deb files on N9, You can download it from here
https://sites.google.com/site/amarraju/vlcremote_1.5.0_armel.deb

A) Enable  http interface in VLC Player


1) Step 1: Open Tools->Preferences

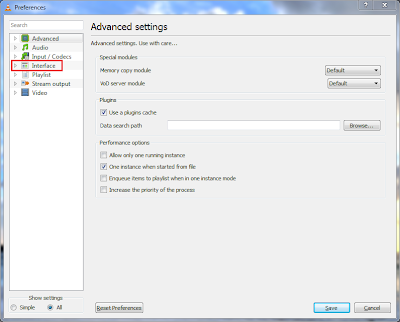
2) Step 2: Select "Show All settings"

3) Step 3: Double Click on "Interface" to bring up the sub menu.

4) Step 4: Click on "Main Interfaces" and then select the "web" option on the right.

5) Now open a web browser and enter the following url
http://127.0.0.1:8080

If you can see the vlc controls, then the http interface is setup properly.

Now try to open the following url
http://<your computer ip>:8080
If this doesn't work, then please follow the below instructions.


B) Enabling permissions for phone (modifying .hosts file)


In the recent versions of VLC, connecting from phones and other machines is blocked by default.
It has to be enabled manually by modifying the .hosts file.

1) Goto the following folder
C:\Program Files\VideoLAN\VLC\lua\http

2) You should find a file called ".hosts" in this folder.

3) Open that file using Wordpad or any other editor.

4) Uncomment all the lines with IP's in it. After editing, your file should look like this.
    Notice no # characters before the IP's

-------------------------------------------------------------------------
#
# Access-list for VLC HTTP interface
# $Id$
#

# localhost
::1
127.0.0.1

# link-local addresses
fe80::/64

# private addresses
fc00::/7
fec0::/10
10.0.0.0/8
172.16.0.0/12
192.168.0.0/16
169.254.0.0/16

# The world (uncommenting these 2 lines is not quite safe)
::/0
0.0.0.0/0


----------------------------------------------------------------------------------

If you want to give specific permissions, then you can edit this file according to your needs.

5) Now restart VLC player and connect from your phone.

Thursday, November 18, 2010

Awk made easy..

AWK SYNTAX:
-----------

awk 'BEGIN{xxx} {yyy} END{zzz}'

xxx - Do all the initializations
yyy - Do the processing/calculations on the input data
zzz - Do the final action, like printing etc.,

Basically BEGIN & END are special blocks.
The yyy block is the main part which will be excuted for each input line.

EXAMPLES:
----------

1) echo "5 10" | awk 'BEGIN{SUM=0} {SUM=SUM+$1+$2} END{print SUM}' //One input line
- This will print 15.
- SUM will be initialized to 0 once in the beginning.
- $1,$2 - first and second argument
- 'print SUM' will print the value once in the END.

2) echo -e "5 10 \n 15 20" | awk 'BEGIN{SUM=0} {SUM=SUM+$1+$2} END{print SUM}' //Two input lines
- This will print 50.
- Basically if there are multiple lines, then awk will do the calculation part(MIDDLE) for each input line.
- But the BEGIN will be executed only once in the beginning. That's why SUM is not reset to 0 everytime.
- Sameway END will be executed only once in the end, That's why the result is printed only once.

MORE EXAMPLES:
--------------

All the three sections in awk are optional. This is explained in the following cases.

1) If you don't have anything to initialize, then you can skip the BEGIN part.
E.g., echo -e "5 10 \n 15 20" | awk '{SUM=SUM+$1} END{print SUM}'
- This will print 20. Sum of the first colum in the two input rows.

2) If you don't have anything to do in the end, then you can skip the END part.
E.g., echo -e "5 10 \n 15 20" | awk '{SUM=SUM+$1}'
- This will just add the first column, but does't print anything. Kind of useless.
E.g., echo -e "5 10 \n 15 20" | awk '{print $1}'
- This is very useful. It just prints the first column of each input row.
Output: 5
15
- This is especially useful in scripting, when you want to extract a column or something like that.

3) If you just want to do something at the end, then you can skip the calculation part also.
E.g., echo -e "5 10 \n 15 20" | awk 'END {print $2}'
- This will print 20, which is the 2nd argument of the last line. This is also pretty useless, without the calculation part.


SOME REAL WORLD EXAMPLES:
--------------------------

1) If you want to extract only the size of the files in 'ls -l' output and print it:
E.g., ls -l | awk '{print $5}' //Very easy right.

2) If you want to extract the size of the files in 'ls -l' and print only the Total size:
E.g., ls -l | awk '{SUM=SUM+$5} END{ print "Total="SUM }'
Print the size in KiloBytes: ( c like printf )
E.g., ls -l | awk '{SUM=SUM+$5} END{ printf("Total= %0.3f\n",SUM/1024) }'

3) If you want to print the size & name of the individual files and also the Total size:
E.g., ls -l | awk '{SUM=SUM+$5 ; print $5,$8} END{print "Total="SUM}'
Note that here we are printing in the calculation part also, which is executed once for each input line.
So we get the individual file sizes and names.
In the END, we print the total size.

Special Variables in awk:
FS - Field seperator ( default blank spaces )
NR - Line number
FNR - Line number in current file
$0 - All the fields in a line


4) In the above examples, 'ls -l' output is space seperated. What if it is seperated by a ":" or some other delimiter ?
Then we have to specify the delimiter manually in BEGIN block. (just like -d option for cut)
E.g., cat /etc/passwd | awk 'BEGIN {FS=":"} {print $1}'
- This will print all the usernames from the /etc/passwd file.
- Note the FS variable. It is the variable used to specify Field Seperator.


5) Preceeding each line in a file with its line number:
E.g., awk '{ print FNR,$0 }' /etc/passwd
- This will output all the lines preceeded by its line number. You can specify multiple files also.

6) Pass variables from SHELL to AWK . Use the -v option and assign the shell variables.
E.g., ls | awk -v a=$PWD '{ printf("%s/%s\n",a,$0) }'


Note: These are some very basic usages of awk. awk is a very powerful tool with a lot of functionality.
Once you get comfortable with these basic usecases, you can easily extend your knowledge of awk further.


Saturday, November 18, 2006

Triple booting WinXP, Vista and Kubunty Edgy

I formatted my harddisk last week and created four partitions. One each for XP, Vista, Linux root and Linux Swap. Got myself a rewritable DVD first so that I dont waste lot of disks. Installed XP first and then downloaded Vista and burned it on the dvd. Started Vista installation and it was very cool. The interface is much better than XP installer. It took approx. 30 mins to install the whole thing. When I finished installing it, I was surprised to see the new Vista interface. It was awesome. Looks like the mac guys are going out of competition. Vista rocks !! But unfortunately, i was not able to intall k-lite codecs. So have to wait for my codec support.
Next I downloaded Kubuntu Edgy 6.10 and burned it. It took me 30 mins to download the 4GB DVD image on my 24mbps connection ;) Pretty fast isn't it. Last time when I booted from the kubuntu CD, it didn't detect my wireless net, video card, sound card etc., But this time everything was up and running from my live CD. Even my NTFS partitions were automatically mounted. So went on to install the actual OS and it was quick. I booted into Kubuntu and installed Automatix and all the apps were installed. But when I tried to play the video, I was disappointed as the playback was choppy. May be it doesn't support my 1680x1050 display. Also the fonts were not to my liking. I liked the fonts in xp and vista much better.

So that's it... now triple booting all three OS's and whiling away my time.
But I am still using XP mainly as it does everything. Once Vista gets all the software problems resolved, there is definitely no looking back...

This is just my experience and not a how-to.